Opening Preparation
Mark Dvoretsky and Artur Yusupov
With contributions from:
Sergei Dolmatov
Yuri Razuvaev
Boris Zlotnik
Aleksei Kosikov
Vladimir Vulfson
Translated by Joint Sugden
В. T. Batsford Ltd, London
First published 1994
© Mark Dvoretsky. Artur Yusupov 1994 Reprinted 1994, 1996 ISBN 0 7134 7509 9
British Library Cataloguing-in-Publication Data. A CIP catalogue record for this book is available from the British Library.
Ail rights reserved. No part of this book may be reproduced, by any means, without prior permission of the publisher.
Typeset by John Nunn GM and printed in Great Britain by Redwood Books, Trowbridge, Wilts for the publishers, В. T. Batsford Ltd, 4 Fitzhardinge Street, London W1H0AH
A BATSFORD CHESS BOOK
Editorial Panel: Mark Dvoretsky, John Nunn, Jon Speclman
General Adviser: Raymond Keene OBE
Commissioning Editor: Graham Burgess
Part 1
General Principles of Opening Play (Artur Yusupov) 11
Logic in the Opening (Mark Dvoretsky)
Unexpected Moves in the Opening (Artur Yusupov) 52 Inventive Solutions to Intractable Opening Problems
Practical Exercises (Mark Dvoretsky)
Part 2
Building an Opening Repertoire (Mark Dvoretsky)
Solutions to Analytical Exercsics
The King's Indian Attack from White’s Viewpoint
Preparing for a Game (Artur Yusupov)
You Arc Right, Monsieur La Bourdonnais!
Part 3
How Opening Novelties Arc Born (Boris Zlotnik)
The Move ...g7-g5 in the French Defence
Opening Investigations (Vladimir Vulfson)
Part 4
Middlegame Problems (Mark Dvoretsky)
The Link between Opening and Endgame
In the Footsteps of One Game (Mark Dvoretsky)
Parts
Samples of Play by Our Students (Artur Yusupov) 282
Let us now define what interest this game holds for us. In the first place we see that the struggle in the centre led to the formation of a specific pawn structure (hanging pawns) which significantly influenced the further plans of both players. Such pawn structures constitute an individual topic that calls for serious study. This aspect of chess possesses its own rules and its own exceptions to them; it includes some features that are common to all structures of a given type and others that arc characteristic only of certain specific positions; and it embraces some standard plans of campaign, one of which White attempted to follow in the above game.
Here is the second thing which it is, I think, important to bring to your attention. When White exchanged his central pawns, it looked as if he was abandoning the centre in the very opening. In return, however, he organised powerful pressure with his pieces against his opponent's central pawns and made them into a real weakness. The game thus compels us to think about the problem of the transformation of a pawn centre. The pawn centre may be replaced by a piece centre, or on occasion it simply makes sense to abandon it. In general. a pawn centre is a good thing not in itself but in its usefulness for concrete ends - such as driving the enemy pieces back (remember we looked closely at Black's ...d5-d4), or holding up his development; or securing convenient posts for your own pieces under cover of the pawns. If the centre does not fulfil these functions (as it did not in the game we have been examining), it can easily become vulnerable and turn into an object of attack.
Of course, the problems of the pawn centre arc by no means exhausted by what has just been said. For example, a very important problem is that of the tension between pawns (between c4 and d5, d4 and c5, etc.). A whole range of questions arises here. When should the tension be maintained, and when not? What arc the means for maintaining these dynamic tensions? What is the right moment to convert them into more static structures? Some of these questions are also in a measure answered by the above game.
The next example will certainly delight adherents of the Dutch Defence. It is a game I played against Grandmaster Bcliavsky, in which the plans of both sides were dictated by the complex pawn structure that is so characteristic of this opening.
Beliavsky-Yusupov USSR Championship (Top League), Minsk 1987
Dutch Defence
Black heads for a 'Stonewall’ formation. His goal is clear - to establish as much control as possible over die c4 square; indeed, any firmer control is hard to imagine. The price of this achievement, however, is a major weakening of the entire darksquare complex. The c5 square is already deprived of pawn protection, and the outcome of the game largely depends on how Black can resist his opponent’s plans to occupy this point.
5 ФГЗ c6
6 0-0 JLd6
At one time the Stonewall was usually played with the bishop on e7. To me it seems that d6 is a more logical place for it. Seeing that the dark squares have been weakened, Black wants to guard them with his pieces as far as possible.
Why did players shy away from 6...ji.d6 in the past? They thought that after 7 Af4 and a bishop exchange, White would strengthen his grip on e5 and acquire a noticeable plus. But it turned out that even then Black can put up plenty of fight..In answer to 7 Af4 I recommend exchanging bishops at once, slightly weakening the opponent’s kingsidc. Otherwise White will play c2-e3, after which an exchange on f4 is extremely dangerous for Black - the reply is c3xf4, and White works up pressure in the e-filc. It is useful to bear this stratagem in mind.
7 b3
Obviously pointing to the possibility of exchanging the dark-squared bishops from a3 - quite a favourable operation for White.
7 ... Й'е7
I don’t mind the bishop exchange as long as White has to insert a2-a4. Why? Because in that case the disparity in value between the two moves preceding the exchange would make itself felt; the developing move of the queen would be more useful than the advance of the rook’s pawn. While White was taking time to move his knight from a3 to a more active post. Black would succeed in preparing ...e6-e5.
8 Ab2 0-0
9 £c3
A natural developing move, but it is not to my own liking. A much better set-up is the one introduced by Tigran Petrosian: White develops the knight on d2 and subsequently aims to control e5 with both knights (2tf3-e5-d3 and Qd2-f3).
Incidentally, in the Dutch Defence White should be cautious about occupying c5. If an exchange of pieces results in a pawn arriving there, Black will no longer have a weakness on this square, and as a rule he will be rid of his opening difficulties.
I now have to solve the problem of developing my quecnside. In particular, this means ’relocating’ the, light-squared bishop - which tends to be the chief cause of Black’s headaches in the Dutch, Two radically Hiffcrent plans are feasible. The first is to fianchctto the bishop, hoping tp carry out an eventual ...c6-c5. But with his knight on c3. White is well prepared for that. I therefore selected the other plan of transferring the bishop Ito hHfrom this square too it will participate in the fight.
9 ... &d71?
10 £c5 Дс8
11 2>d3
Not having very much experience of the Dutch, Bcliavsky fails to find an effective plan. The time lost in transferring the knight from f3 to d3 could certainly have been used to better purpose. Instead of the move played. White should have bolstered his central position with 11 e3 and perhaps even followed with f2-f4.
11 ... £bd7
12 e3(10)
Not a very effective decision. White seems to be playing without a definite plan. He should have faced the fact that he has no advantage, and played 12 f4!?, guaranteeing an equal game.
10
В
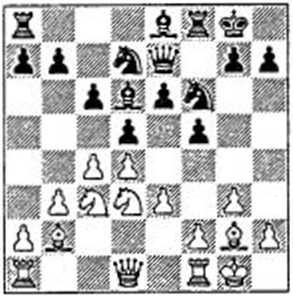
What can be said about the position we have now reached? Black is. verv strongly established in the centre: his pawn structure is solid. He is therefore already quite entitled to think about active operations.
12 ... g5!
If you don't have the central position under control, it is better to avoid this kind of undertaking; otherwise you risk suffering a counterblow in the centre and coming away empty-handed. But there is no danger of this in the present case, since Black firmly controls the entire complex of central squares. The fact that the kingsidc is now the object of his attention is easy to explain - nearly all his pieces are pointing in that direction. So Black’s plan arises naturally out of his pawn structure and the arrangement of his pieces. I believe that my position is already slightly superior.
Beliavsky's assessment of the position was evidently similar, or he would not have started locking for simplification.
13 a4
White returns to the idea of exchanging the dark-squared bishops; by this means he hopes somehow to extinguish his opponent’s initiative.
13 ... Ag6
It was also worth considering 13...ДЬ5 14 Wcl Qe4, with somewhat the better chances. The move played has the aim of hindering White’s obvious plan - 'tt'cl and ДаЗ. For of course 14 'S'cl would now be met by 14...f4.
14 f4
White insists on carrying out his plan.
14 ... ДЬ5
There is no longer anything for the bishop to do on g6.
15 ^cl
White should evidently have decided on 15 Д13!?. This may look a little strange, but then White already has to think about defending. In addition, it is quite possible that the bishop on g2 will soon prove inferior to its opposite number on h5; after all, it is only directed against the solidly defended pawn on d5.
15 ... Фе4
16 Cg(ll)
Played in the hope of establishing his knight on f4 (after the natural 16...Bxg5); but...
II В
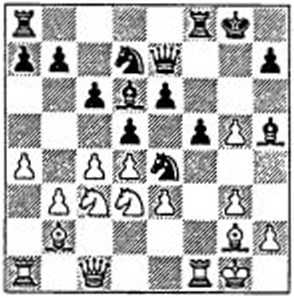
16 ... ФхсЗ!
17 Wxc3 Де2
On f4 the knight could indeed be a bulwark of the defence, so I willingly give up my bishop for it.
18 Zfel Дх<13
19 #xd3 ^xg5
Black has acquired a noticeable plus, which resides above all in the structure of his position. He is threatening a highly unpleasant advance of his h-pawn to attack the pawn-chain h2-g3 and thus create palpable weaknesses in the White camp.
To counter that plan, Beliavsky carries out the following exchanging operation:
|
20 |
ДаЗ |
ДхаЗ |
|
21 |
НхаЗ |
£f6 |
|
22 |
«П |
h5! |
|
23 |
«xf4 | |
|
24 |
gf |
Despite the simplification, the ensuing endgame is difficult for White. I .was the first to seize the g-filc, and in addition the white bishop proved weaker than my knight. This is quite a standard ‘Stonewall’ situation: the bishop comes up against a barrier of black pawns while there is nothing to
stop the nimble knight from creating

Black subsequently managed to win in instructive fashion by going into a rook ending. In the process, a further structural advantage took shape: as a result of the exchange of minor pieces on c4, a black pawn appeared on that square, considerably cramping the enemy.
Among the instructive aspects of this game, I would point to Black's treatment of the centre. He accorded it his constant attention, and strove to cover the crucial e5 square with his pieces. Only after achieving a solid position in the centre did he venture on active kingside operations.
I shall now demonstrate two more games from the same event, the 54th USSR Championship in Minsk. The first, against Grandmaster Tseshk-ovsky, is interesting for the way in which White makes use of his pawn centre. Strictly speaking this is a middlegame operation, but studying the opening in isolation from the middlegame is scarcely appropriate. The standard pawn structure arising from the opening plays a large part in determining the further course of the game. The modem approach to the opening consists precisely in studying such typical structures, in probing deeply into their characteristic laws and the methods of combat which they demand.
Yusupov-Tseshkovsky USSR Championship (Top League), Minsk 1987
Griinfcld Defence
|
1 |
d4 |
£f6 |
|
2 |
c4 |
g6 |
|
3 |
£c3 |
d5 |
|
4 |
cd |
£xd5 |
|
5 |
e4 |
ФхсЗ |
|
6 |
be |
A fashionable Griinfcld variation. White has the pawn centre; Black tries to attack it with his pieces and undermine it.
|
6 ... |
ДВ7 | |
|
7 |
Дс4 |
0-0 |
|
8 |
£e2 |
с5 |
|
9 |
0-0 |
£с6 |
|
10 |
ДеЗ | |
The plan my opponent now chose was not the most thematic:
10 ... £a5
The usual line is 10...&g4. Instead, by taking the pressure off the d-pawn, Black is surely leaving me with more scope to manoeuvre.
11 £d3 b6
12 Zcl Wc7
The immediate capture on d4 was worth examining, since the possibility of d4-d5 is one of Black’s problems in such positions. In many cases the advance of the d-pawn is beneficial to White in spite of Black’s usual countcrplay based on ...c5-c4 and the break with ...e7-e6.
I decided that for the moment I would simply strengthen my position.
13 «fdZ ДЬ7
In a strict sense, the opening is over - both sides have developed their pieces. However, for a better understanding of this kind of position, it is useful to observe how White utilises his central advantage to work up an initiative.
14 £h6
An advantage of possessing the centre is that the play may more easily be transferred to the flanks. White considers that under cover of his powerful centre he is already entitled to go into action against the enemy king. The exchange of dark-squared bishops is part of his strategic plan, since the bishop on g7 is a very active piece and also, properly speaking, the king’s sole defender.
14 ... 2ad8
15 h4’?
A theoretical novelty. It was also worth considering 15 d5. After the moves 15...c4 16 Ac2 c6 17 jtxg7 4xg7, White plays 18 f4l, while if 18...ed, then 19 e5 with an attack. In the game, I managed to carry out this same idea in an even more advantageous form.
15 ... «r'd6?J
A move lacking in concrete aims. He could have attacked the centre more effectively with 15...£}c6, and if 16 d5 then 16...<£e5, trying to utilise the central squares to hamper the co-ordination of White's pieces.
16 d5
The start of a highly instructive operation, by which White strengthens his central position still further. Black's reply is forced, since 16...C6? fails to 17 c4.
16 ... c4
17 Дс2 еб?!
If Black had anticipated what now follows, he would have preferred 17...e5. But assessing the position wrongly, Tscshkovsky advanced his pawn only one square.
18 &xg7 *xg7 (12)
At this point White finally consummates his plan, which involves a positional pawn sacrifice.
19 Г4!
White’s idea is easy to understand: after 19...cd 20 c51, he will occupy the excellent central square d4 with his knight and follow with f4-f5 etc. In other words the pawn centre
12
will be replaced by a pawn-and-piecc centre, under cover of which White will conduct a forceful attack on the king.
Tscshkovsky is an experienced player, and of course he perfectly sized up the danger of taking the white d-pawn. He set his hopes on undermining the centre with:
19 ... Г5
But here too, the defects of Black’s position are so to speak visible to the naked eye: his king is exposed, the knight on a5 is shut out of play. White has more pawns in the centre - these are all very significant factors. Not surprisingly. White finds a clear-cut solution.
20 £d4!
The knight will help the pawns to advance further.
20 ... fe
21 de
Of course not 21 йхсб+?? because of 21...«xe6. Accomplishing his pawn breakthrough in the centre. White has created a mighty passed pawn on еб which gives his opponent no end of trouble.
21 ... 2>c6
22 fS!
Л much weaker move would be 22 Дхе4?! on account of 22...£}xd4 23 «xd4+ «xd4+ 24 cd Дхе4 25 e7 Zxd4 26 cf&’-f- ФхГ8, and Black has enough compensation for the exchange.
22 ... &xd4
23 cd
The queens must be kept on. At this point 23...«xd4+? would lose by force to 24 «xd4+ 2xd4 25 e7 Se8 26 f6+ ФГ7 27 Да4. It is easy to see that capturing on f5 is also hopeless, for example 23...Zxf5? 24 Zxf5gf25«g5+.
23 ... «e7
24 Да4! (13)
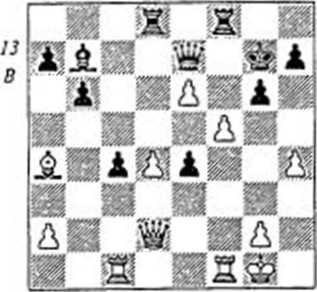
The triumph of White's central strategy! In effect he has three connected passed pawns, the one on еб being especially dangerous. What can Black offer in the way of resistance? If 24.,,gf, White simply goes into the ending with 25 «g5+, after which the c-pawn is simply not to be stopped. On the other hand if 24...Sd5, White achieves his aim with 25 fg hg 26 Sxf8 Wxf8 27 3f 1 Sf5 28 3xf5!, and again the pawn on еб advances to queen. So Black has little choice.
24 ... ttxfS
25 3xf5 gf
26 ЙТ4!
The e-pawn is now defended indirectly (26...Wxc6 27 ^c7+). White intends 27 Sxc4 with the terrible threat of Sc7.
26 ... £dS
26,..Sf8 would not save him either, in view of 27 Sxc4 ‘'Й'хсб 28 Sc7+ ЗГ7 29 ДЬЗ £d5 30 Axd5 Sa'xdS 31 'ii'gS4-, and White wins with a direct attack.
27 We5+ ФБ6
White wins after 27...<3?g8 28 Sc3 or 27..Ж6 28 e7.
28 Sc3 f4
29 h5+ 1-0
The result was to be expected -the game had not gone Black's way. First he missed the right moment to join combat in the centre, then he dithered a little more - and White overcame him with vigorous attacking play. What else can be said? Observe how White combined the threat of a central breakthrough with threats against the king. This too is one of the advantages of a strong centre - under cover from it, you can start an attack on the king at any moment!
In the following game, a popular variation of the Benoni was played.
Yusupov-Dolmatov USSR Championship (Top League), Minsk 1987
|
Modern I |
Senoni | |
|
1 |
d4 |
£f6 |
|
2 |
c4 |
еб |
|
3 |
£f3 |
c5 |
|
4 |
d5 |
ed |
|
5 |
cd |
d6 |
|
6 |
£c3 |
g6 |
|
7 |
Af4 |
a6 |
|
8 |
e4 |
b5 |
In textbook terms, this kind of flank attack by Black ought to be refuted by White’s action in the centre - and in general such pawn moves are supposed to be incorrect, premature, and so forth. In the Benoni, however, the pawn advance to b5 has a serious purpose, which lies not so much in direct queenside play as in the fight against the opponent’s centre! As a rule Black proceeds to drive the knight away from the strong square c3, and in many cases - if he achieves ...c5-c4 - his own knight will head for c5 to threaten the white e-pawn. To outflank While’s centre with a view to organising pressure against it - this, we may say, is the fundamental idea of the Modem Benoni.
White should of course keep to the usual rules, in other words prepare a break in the centre. This is the aim of his next move.
9 We2 QhS
Already Black has to defend against e4-c5.
10 £g5 Ac7
11 Ah6
A third move with one piece in the opening! This looks like a gross offence against-the laws of development. But in the meantime Black has not been making useful moves either. He has spent a tempo removing his knight from the centre with ...&h5. He has admittedly developed his bishop, but e7 is is by no means the best square for it. And I have taken die opportunity to stop him doing something essential - castling.
11 ... ДГ8
Sure proof that White’s moves Ag5 and ДЬ6 were not a waste of time.
12 «еЗ ДхЬб
13 Wxh6
Black should now have used the breathing space to develop his pieces. The theoretical line is IS.-.'Sid?. But Dolmatov employed a new move:
13 _ b4?I
This decision might seem well-founded; the knight is expelled from the centre. But at the same time die quccnside pawn structure that Black obtains is none too favourable. The c4 square becomes a goal for a white knight. From there it will not only pressurise the pawn on d6 but also support the e4-e5 break.
14 £dl Wf6
Black plainly shows that he too is thinking of active play - for example, White has to reckon with a black piece invading on f4 (if, say, 15 Ae2, then 15...£if4).
What is White to do, then? There is no way of finishing his development quickly. He has to use a little cunning.
15 £d2!
Another move that seems to go against the rules, but in actual fact it serves the purposes of development by preparing g2-g3. In this way White solves several problems at once. He shuts the knight on h5 out of play, the bishop on g2 will support the centre; and in due course the knight will go from d2 to c4.
Black stands considerably worse. He should now have continued his development with 15...®d7. It is true that even then, after 16 g3 Q&5 17 Дс2! (it is important to control d31), I would have had a tangible plus. For instance if 17...^g4, While would simply exchange on g4, after which cither f2-f3 or *£jc3 could be played.
Instead, Dolmatov tries to solve the problem of the queenside and the c4 square at one stroke, but the move he plays is probably already the decisive error.
15 ... Ad7? (14)
14
W
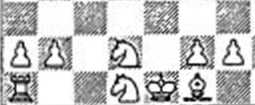
How should I proceed now? I could of course curry on with my original plan of 16 g3, but Black replies 16...Ab5, after which White’s chief trump - the square c4 - will fall; if the bishops are exchanged, a black pawn appears on b5.
There is, however, another way. Realising what the opponent intends, White can try to stop him. For such a possibility exists.
16 a4!
The bishop cannot now reach b5. It becomes clear that with 15...Ad7 Black was merely depriving his queen’s knight of its rightful square. It is hard to sec how he will now complete his development.
Dolmatov found nothing better than:
16 - 'irdS
But naturally, this led to no good.
17 g3 Ag4
IS ФсЗ Af3
/\t this point White could simply have played 19 £lxf3 #xf3 20 Ag2 ‘«r'fb 214)c4 with a clear plus. But by now he is out for more, and acts more vigorously, bearing in mind that with a lead in development (even though it is none too obvious at present) you have to attack!